A pre-mortem template is a risk management method developed by Gary Klein in 2007. Rather than waiting to find out what went wrong after a project has failed, the pre-mortem approach encourages teams to proactively analyze what could go wrong before the project even begins. The team then works backward to create a plan that prevents those potential issues from derailing the project. The core objective is to increase the probability of project success by openly discussing failure points at the very start, when there is still time to act on them.
In business, a postmortem refers to a structured project analysis conducted after completion. It involves a thorough examination of what did not go well and what did go well, capturing lessons learned that can be applied to future projects. The word “mortem” itself means “death” — a reference drawn from medical practice, where a pathologist performs a postmortem examination to determine the cause of death and uncover insights that may help prevent similar deaths in the future. The same logic applies in project management: understanding failure, whether anticipated or actual, is one of the most powerful tools available for continuous improvement.
Pre-Mortem vs Retrospective
Pre-mortem and retrospective are not mutually exclusive approaches — in fact, they complement each other and together serve a vital purpose in effective project leadership. A project management agile retrospective dissects a completed project to discover what went wrong and what went right, so that the same mistakes can be avoided and the same successes can be replicated in future projects. The key difference is timing: a pre-mortem is conducted before a project begins, while a post-mortem or retrospective is conducted after the project has closed.
It is also important to note that a retrospective does not necessarily mean the project has failed. Projects can be closed successfully and still benefit enormously from a retrospective because even well-delivered projects encounter their share of misadventures, wrong turns, and near-misses. Examining these experiences through a structured retrospective helps teams understand how to navigate similar situations more effectively in the future.
Used together, a pre-mortem and a retrospective give project teams a comprehensive understanding of the underlying currents that shape project outcomes — both before and after delivery. The more deeply a team understands the factors that drive project success or failure, the more confidently and effectively they can plan and execute future initiatives.
Access to our collection of 17 best agile retro templates
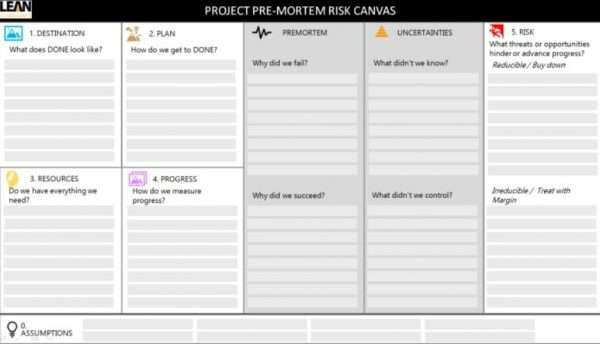
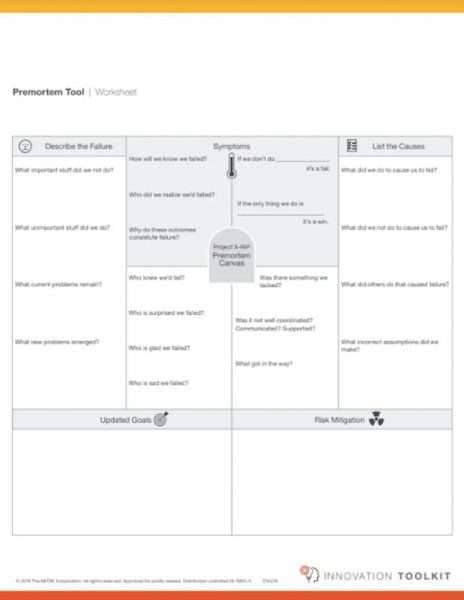
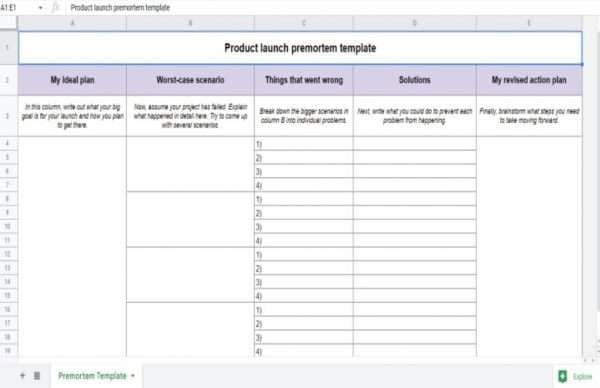
A premortem analysis involves discovering the factors that may result in project failure to avoid potential issues and anticipate risks. It allows one to learn from mistakes and increases the chances of eliminating them at the start of the project. This excel template can be used for large and small projects and includes a chart for an action plan to mitigate risks.
Why Should You Do a Pre-Mortem Analysis?
A pre-mortem analysis involves identifying the specific factors that could result in project failure, so that teams can anticipate risks, design mitigation strategies, and eliminate potential problems before they materialise. It allows teams to learn from hypothetical mistakes at the stage when prevention is still possible, significantly increasing the chances of a successful outcome. This approach is particularly valuable for both large and small projects and pairs well with a structured action plan to address the risks identified during the session.
According to most research and industry reports, projects fail at an alarming rate of approximately 70%. A significant portion of these failures can be attributed to well-documented cognitive biases that distort planning and decision-making:
- Confirmation Bias: This is the tendency for people to favour information that confirms what they already believe. In project management, confirmation bias can manifest as overly optimistic competitive analysis, unrealistic project objectives, or a reluctance to honestly assess the current state of the project. Teams unconsciously filter out warning signs that challenge their assumptions.
- Overconfidence Bias: This is the tendency to overestimate one’s own abilities, knowledge, and the likelihood of a positive outcome. In project contexts, overconfidence leads team members and managers to promise more than they can deliver, make decisions without adequately reflecting on potential risks, and underestimate the complexity of the work involved.
Understanding these biases is one of the most compelling reasons to conduct a pre-mortem analysis. By creating a structured environment where brainstorming is encouraged and all concerns are welcome, the pre-mortem counters these biases and promotes more objective, honest, and open discussions about doubts, risks, and assumptions. It enables team members to surface weaknesses and flaws in the plan without fear of judgment, and it sharpens the entire team’s ability to recognise and respond to early signs of project trouble before they escalate.
How to Hold an Agile Team Pre-Mortem
A pre-mortem is a powerful yet straightforward meeting format that helps teams identify and prevent potential issues before they occur. The following steps provide a practical framework for conducting an effective pre-mortem analysis with your project team.
Step 1: Prepare
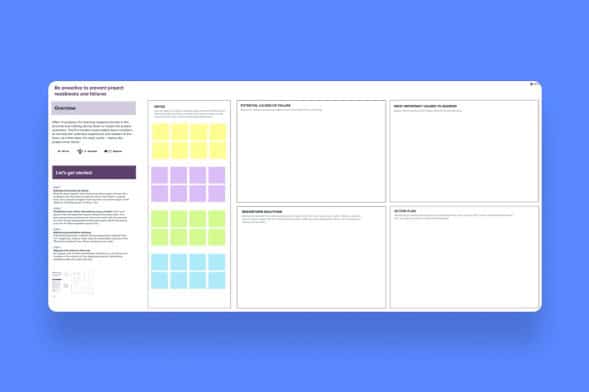
Ensure that all team members and stakeholders who play a significant role in the project attend the meeting. If key stakeholders are absent, critical risks can be overlooked — and those overlooked risks are often the ones that cause the most damage later. Given that many teams operate in hybrid or fully remote environments, it is essential to create a shared digital document that all participants can access and contribute to in real time, regardless of their physical location.
Structure the document with the following column headers to guide the session:
- What may cause us to miss the deadline?
- What can keep the project on time?
- What does the project need that is not currently available?
- What do we already have that is needed by the project?
- What lessons learned are available from past projects?
- What should we be worried about?
- What should we be excited about?
- What do we need to discuss further?
Step 2: Set the Stage
Open the meeting by asking the team to consider two broad categories of questions: what might go wrong with the project, and what is already looking positive. Framing the session around both negatives and positives keeps the tone balanced and constructive, ensuring that the discussion remains focused and that team members feel comfortable voicing genuine concerns without the session becoming overly negative or demoralising.
Step 3: Brainstorm
Allow the team to work either individually or in small groups to answer the questions in the shared document. Encourage everyone to brainstorm and write down every idea that comes to mind and to approach the exercise with creativity and openness. No idea should be dismissed at this stage — the goal is to surface as many potential risks and success factors as possible. Participants should add their responses directly to the relevant columns in the shared document so that all input is captured and visible to the full group in real time.
Step 4: Merge Similar Ideas
Once all ideas have been captured, review the document and consolidate similar or overlapping entries to remove duplication and create more space for focused discussion. This step also involves refining vague ideas into more specific and actionable ones. For example, a general entry such as “the technology may not work well” should be refined to identify precisely which technology components present a risk and why — this level of specificity is what makes pre-mortem insights genuinely actionable.
Step 5: Identify the Threats
Ask each team member to vote on the ideas they believe represent the most significant threats to project success. Giving each participant a limited number of votes — for example, three to five — forces the team to prioritise and focus on the risks they consider most serious rather than treating every item equally. The results of this voting process form the foundation of your risk mitigation plan.
Step 6: Identify the Success Factors
Apply the same voting process to identify the key factors that the team believes are most critical to achieving project success. Understanding what is already working in your favour is just as important as identifying what could go wrong, as it allows the team to protect and build on existing strengths throughout the project lifecycle.
Step 7: Discuss and Develop Action Items
Allocate dedicated time for the team to discuss the highest-priority threats and success factors identified through voting, and collaboratively develop specific action items for each. These action items should be concrete, assigned to a named individual or team, and realistic in terms of the time and resources required to implement them.
Step 8: Take Action and Assign Ownership
Ensure that every action item generated during the pre-mortem session is assigned a clear owner — a specific individual or team responsible for implementation — and a firm deadline for completion. Without clear ownership and project deadlines, even the most thorough pre-mortem analysis will fail to translate into meaningful change. Follow up on action items regularly to ensure that risks are being actively managed throughout the project.
Pre-Mortem Template PowerPoint
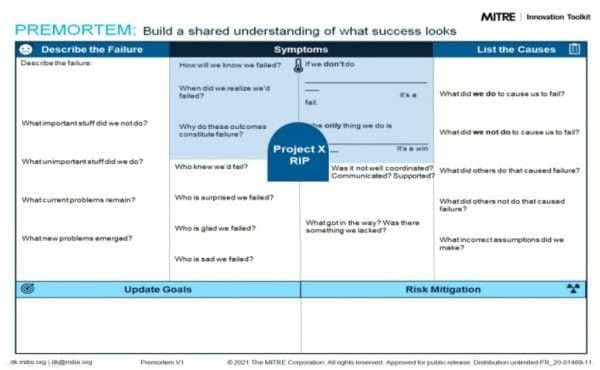
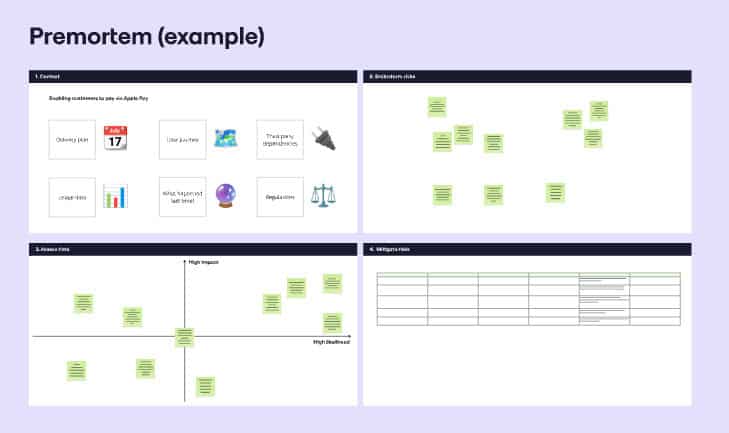
PowerPoint-based pre-mortem templates are ideal for facilitating structured team discussions and presenting findings to stakeholders in a clear, visual format. These templates help teams identify failure drivers, examine their root causes, and evaluate whether appropriate mitigation steps are being taken.
They also provide a useful framework for framing project problems by exploring future scenarios in which the project might fail, identifying the specific causes of those failures, and describing what they would look like in practice. A well-designed PowerPoint pre-mortem template gives the entire team a shared visual reference for success criteria, project priorities, and potential pitfalls — all in one place.
Pre-Mortem Template PDF
PDF pre-mortem templates offer a clean, fixed-format option for teams that prefer a structured document they can distribute, print, and reference throughout the project. They are particularly useful for capturing and sharing pre-mortem findings with stakeholders who need to review the analysis without needing to edit the document directly.
Pre-Mortem Online Tools
In many projects, critical learning happens too late in the process to meaningfully impact outcomes. The following online pre-mortem tools help teams harness collective wisdom and experience early, at the point when that knowledge can actually make a difference.
Figma
The Figma pre-mortem template helps teams prepare for new developments and challenges before the project begins. It is particularly well suited for design-driven teams that are already working within the Figma ecosystem and want to integrate risk planning into their existing creative workflow.

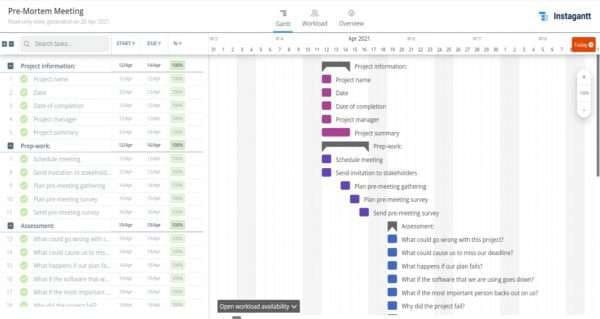
Instagantt
The Instagantt pre-mortem template is a powerful online tool that supports the full pre-mortem process — from planning and conducting the session to storing and organising the information gathered so it can be easily reviewed and referenced throughout the project lifecycle.
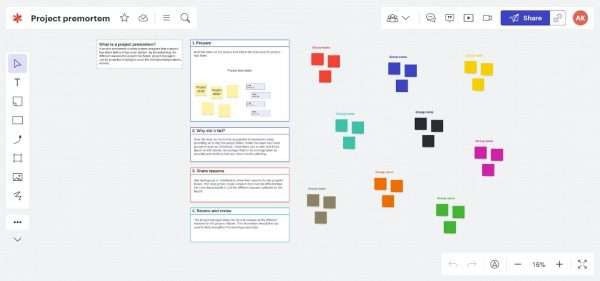
Lucidspark
The Lucidspark pre-mortem template is designed for collaborative brainstorming sessions where teams identify the ways a project could fail before that failure occurs. Its visual, whiteboard-style format makes it easy for teams to explore risk scenarios creatively and organise their findings in a structured way.
Mural
Mural is a digital workspace that enables teams to think and collaborate visually. This template will help you facilitate premortem sessions, brainstorm potential project risks, and align your team on solutions — all in one shared, interactive space.
Template.net
Template.net offers a ready-to-use premortem template designed to help project teams proactively identify and address potential risks before they occur. Use it to streamline your risk assessment process and keep your project on track.

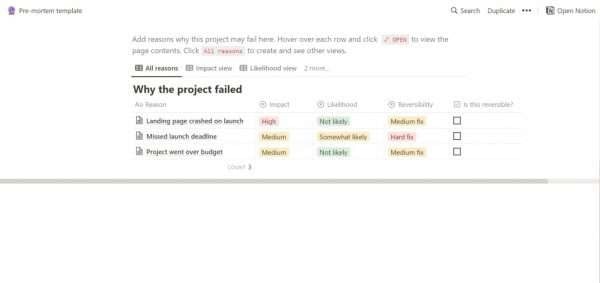
Notion Pre-Portem Template
The Notion pre-mortem template is a flexible, document-based option ideal for risk documentation and contingency planning. It allows teams to capture potential failure points, assign owners, and build out a clear action plan that can be updated and referenced as the project progresses.
Miro Pre-Moretem Template
The objective of this Miro template is to identify potential pitfalls in the next project cycle, establish a clear, actionable plan for the most likely ones, and help teams proactively reduce risk.
Pre-Mortem Template Excel
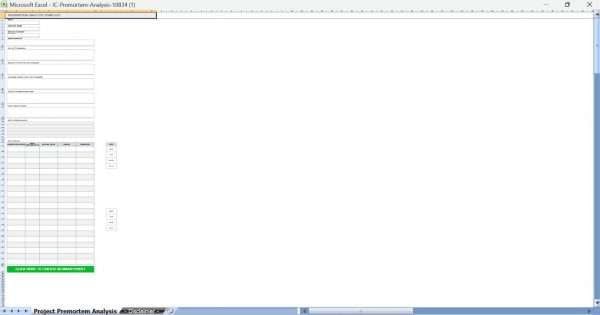
Excel-based pre-mortem templates are well suited for teams that want to combine risk identification with structured data tracking. They allow teams to log potential failure points, assign risk scores, track mitigation actions, and monitor progress — all within a single spreadsheet. An Excel template can be used effectively for both large and small projects and works especially well when paired with a built-in action plan chart that makes it easy to visualise risk ownership and resolution timelines at a glance.
Pre-Mortem Best Practices
To get the most value from your pre-mortem analysis, keep the following best practices in mind throughout the process:
- Be Specific, Not General: Avoid vague statements about potential failure. The more precisely you can describe a risk — including its cause, likely impact, and early warning signs — the more actionable your mitigation plan will be.
- Keep the Session Professional: Pre-mortem meetings should focus exclusively on identifying and solving project risks. They are not the appropriate venue for settling scores, airing personal grievances, or assigning blame for past failures.
- Make the Document Easily Accessible: Store the pre-mortem document in a central, clearly labelled location that all team members can find and access quickly. This ensures that everyone stays informed about documented risks and any updates to the mitigation plan as the project evolves.
- Integrate Action Items Into Your Project Board: Transfer pre-mortem action items directly into your virtual or physical project board so that progress can be tracked alongside all other project tasks and remains visible to the whole team.
- Review and Revise Regularly: A pre-mortem is not a one-time exercise. Revisit the document at key project milestones to assess whether identified risks have materialised, whether new risks have emerged, and whether mitigation actions are proving effective.
Video Explaining What a Pre-Mortem Is
Not sure where to start with pre-mortems? Watch the short video below for a quick, clear overview of what a pre-mortem is and how it can help your team get ahead of project risks before they happen.
Conclusion
A pre-mortem is one of the most practical tools a project manager can use. By imagining failure before it happens, you and your team can identify risks early, align on priorities, and put the right safeguards in place. The 13 free templates in this guide make it easy to run a structured pre-mortem session, regardless of your project’s size or complexity.
Whether you choose an Excel, Google Sheets, or PDF format, the most important step is simply getting started. Download the template that best suits your workflow, bring your team together, and take the time to plan proactively. A few hours spent on a pre-mortem today could save your project from a preventable failure tomorrow.
Pre-Mortem FAQs
Who created the pre-mortem?
The pre-mortem method was developed by Gary Klein in 2007 as a structured approach to risk assessment and failure prevention. Since its introduction, it has been widely adopted across management, business strategy, product development, and project management disciplines around the world.
What is the first step of a project pre-mortem?
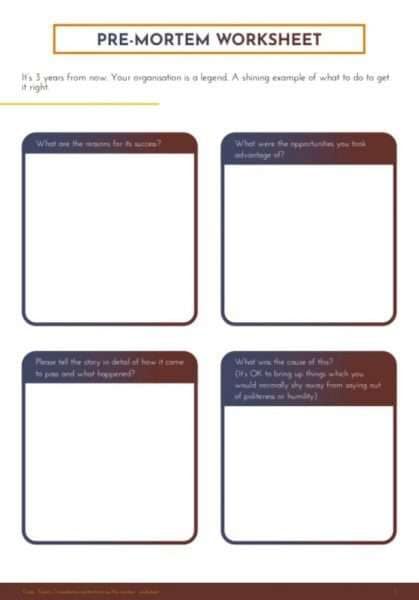
The first step of a project pre-mortem is to bring together all relevant team members and stakeholders and ask them to imagine that the project has already failed. From that imagined future point, participants create a comprehensive list of the problems and circumstances that could have led to that failure. This future-backwards perspective surfaces issues that might otherwise go unspoken during standard planning sessions.
What is a post-mortem meeting?
A post-mortem meeting — sometimes called a retrospective — is one in which the project team reviews a completed project to understand what caused it to succeed or fail. Unlike a pre-mortem, which takes place before the project begins, a post-mortem is conducted after the project has closed and focuses on capturing lessons learned for future application.
What happens next after the premortem?
Once the pre-mortem session is complete, the team has a documented set of identified risks, prioritised threats, and agreed action items with assigned owners and deadlines. All that remains is running the project — with the significant advantage of having already surfaced and planned for the most likely causes of failure before they have a chance to occur.
Suggested articles:
- 23 x Risk Management Plan Templates (Google Docs, Excel, and PDF)
- Risk Management Plan Template: Pull Key Risks from PDF Audits
- Risk Transference in Project Management
Shane Drumm, holding certifications in PMP®, PMI-ACP®, CSM, and LPM, is the author behind numerous articles featured here. Hailing from County Cork, Ireland, his expertise lies in implementing Agile methodologies with geographically dispersed teams for software development projects. In his leisure, he dedicates time to web development and Ironman triathlon training. Find out more about Shane on shanedrumm.com and please reach out and connect with Shane on LinkedIn.