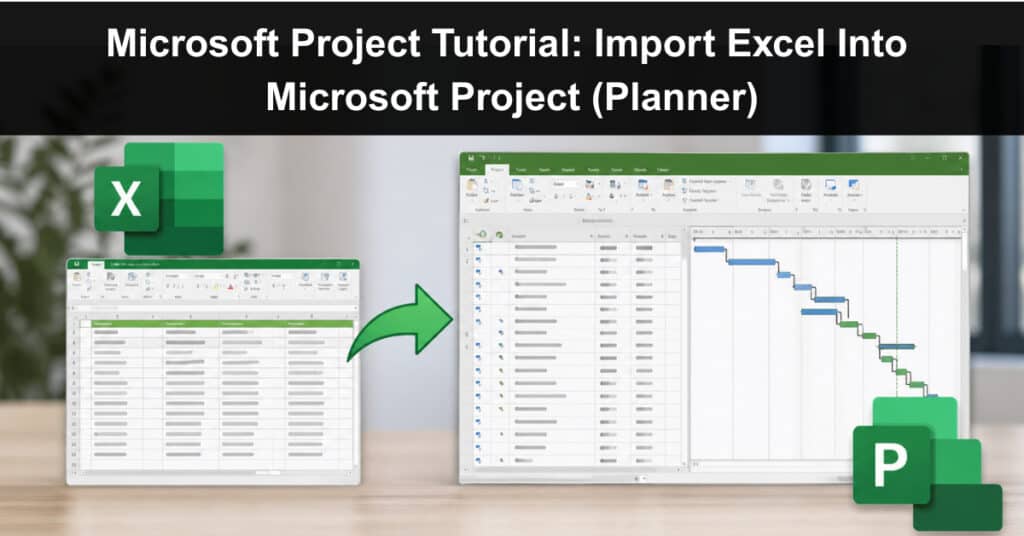
For years, project managers have wrestled with the challenge of consolidating schedules from vendors who prefer Excel over Microsoft Project. In the past, the process was clunky, requiring manual import maps, .xls conversions, and painstaking outline adjustments. Fast forward to 2026, and Microsoft has transformed this workflow.
Not only has the Import Wizard been modernized with direct .xlsx support and auto‑mapping, but Project for the web has merged into Microsoft Planner, creating a unified platform for collaboration. This means imported Excel schedules can now flow seamlessly into Planner, where teams track tasks, visualize progress, and collaborate in real time.
Why Import Excel Into Microsoft Project?
Excel is widely used for quick task lists, milestone tracking, and vendor reporting because it’s simple, flexible, and universally accessible. However, Excel alone cannot provide the advanced scheduling, dependency management, or critical path analysis that complex projects demand. Microsoft Project bridges this gap by transforming static spreadsheets into dynamic schedules. And with Planner now integrated, collaboration extends beyond the desktop into a unified workspace.
Schedule in Excel
By importing Excel into Project, you can achieve the following:
- Consolidate Vendor Schedules Into a Master Plan: Instead of juggling multiple spreadsheets from different vendors, Project allows you to merge them into one integrated schedule. This consolidation makes it easier to see how external deliverables align with internal milestones and ensures everyone is working toward the same deadlines.
- Maintain Task Hierarchies and Dependencies: Excel lists tasks linearly, but Microsoft Project structures them into hierarchies with summary tasks and dependencies. This hierarchy is essential for understanding how smaller tasks roll up into larger deliverables and how delays in one activity can affect the entire project timeline.
- Track Progress with Roll‑Up Summaries and Baselines: Project supports baselines, enabling you to compare planned versus actual progress. Roll‑up summaries provide visibility into overall project health, helping managers quickly identify slippage or risks. Excel lacks this built‑in tracking capability, making Project indispensable for monitoring execution.
- Collaborate Seamlessly Using Microsoft Planner (Formerly Project for the Web): Once imported, schedules can be published to Planner, where teams interact with tasks in Kanban boards, timeline views, or Gantt charts. This integration ensures that updates are visible to all stakeholders, fostering transparency and accountability across distributed teams.
By importing Excel into Microsoft Project and then publishing to Planner, project managers gain:
- A Single Source of Truth for All Schedules: No more conflicting spreadsheets—everyone works from the same integrated plan.
- Automated Reporting with Dashboards and Charts: Project data flows into Power BI and Planner dashboards, providing real‑time insights without manual reporting.
- Collaboration Tools That Extend Beyond the Desktop: Teams can update tasks, track progress, and communicate directly in Planner, ensuring schedules remain living documents rather than static files.
Preparing Your Excel File
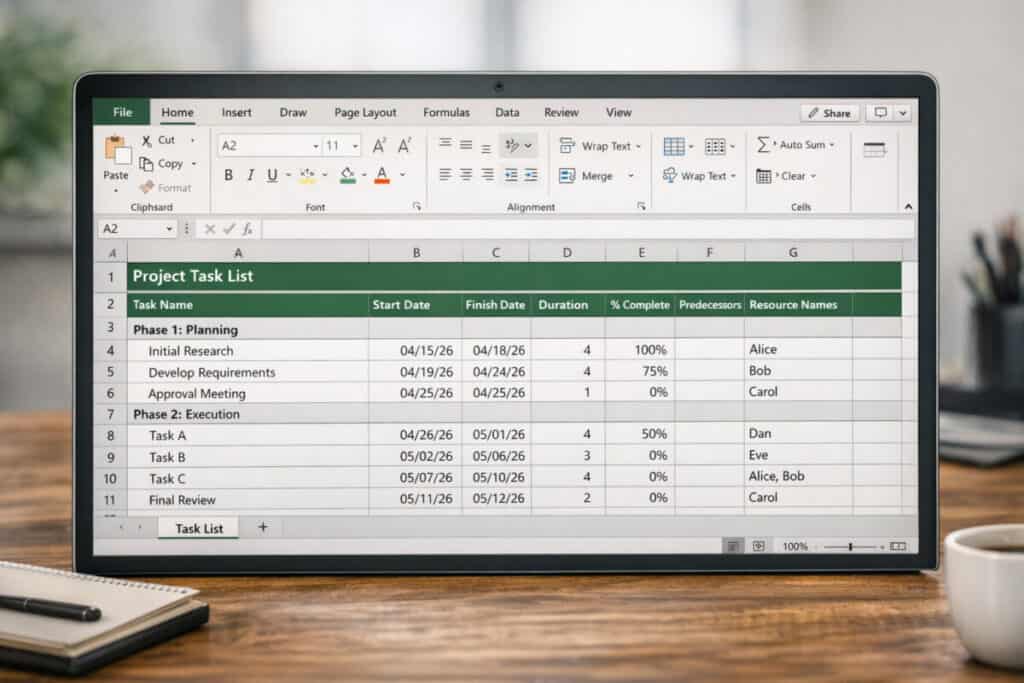
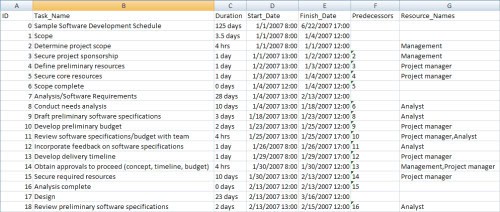
Before importing, structure your spreadsheet carefully. Microsoft now provides a Project Task List template in Excel, which aligns directly with Project fields.
Recommended columns:
- Task Name – descriptive title of the activity.
- Start Date / Finish Date – planned timeline.
- Duration – number of working days.
- % Complete – progress tracking.
- Predecessors – task IDs for dependencies.
- Resource Names – assigned team members.
Pro Tip: Ask vendors to use this template. It reduces mapping errors and ensures smoother imports.
Build the Excel to Project Import Map
My solution was to develop an import map that includes the key fields in the table below
| Field Name | Description |
|---|---|
| ID | The Task ID for the Microsoft Project task |
| Outline Level | Determines the Outline Level in a project’s hierarchy. An Outline Level of 1 is at the highest level in the hierarchy, and an Outline Level of 5 has four summary level tasks above it. |
| Name | Task Name |
| Start | Forecasted Start date |
| Finish | Forecasted Finish date |
| % Complete | Task completion percentage |
| Baseline Start | Original Baseline Start date |
| Baseline Finish | Original Baseline Finish date |
| Actual Start | Actual task Start date |
| Actual Finish | Actual task Finish date |
| Predecessors | Identifies the Task ID of a predecessor task |
| Resource Name | Determines the Outline Level in a project’s hierarchy. An Outline Level of 1 is at the highest level in the hierarchy, and an Outline Level of 5 has four summary-level tasks above it. |
Step‑by‑Step: Import Excel Into Microsoft Project
Step 1 – Launch Project

Starting in the right place ensures you’re using the modern import wizard. Microsoft Project Desktop now includes a direct option to create projects from Excel workbooks, eliminating outdated .xls conversions. This step sets the foundation for a smooth import process by ensuring compatibility with auto‑mapping and Planner integration.
- Open Project Desktop: Use the latest Microsoft 365 version for full compatibility.
- Navigate to File > New: Select New from Excel workbook instead of the older “Open” method.
- Benefit: This workflow ensures you’re using the modern import wizard designed for
.xlsxfiles.
Step 2 – Select Your File
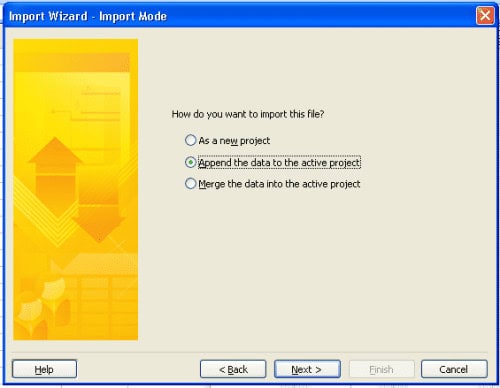
Choosing the correct file and import mode is critical. Microsoft now supports .xlsx directly, so you can import vendor schedules without reformatting. At this stage, you also decide whether to start fresh or append data to an existing project, which determines how the imported tasks integrate with your current schedule.
- Choose your Excel file: Both
.xlsxand legacy.xlsformats are supported. - Select import mode: Import into a new project or append to an existing one.
- Benefit: Flexibility allows you to consolidate multiple vendor schedules into a master plan.
Step 3 – Use the Import Wizard
The Import Wizard has been redesigned to simplify mapping. It automatically recognizes common fields but gives you control to adjust mappings. Saving your map ensures consistency across future imports, reducing repetitive setup and ensuring vendor data aligns with your project structure every time.
- Choose Data Type: Import Tasks, Resources, or Assignments depending on your needs.
- Verify Field Mapping: Auto‑mapping covers most fields, but you can fine‑tune.
- Save Map: Store mappings for reuse, ensuring consistency across vendor imports.
- Benefit: Reduces manual effort and ensures data integrity.
Step 4 – Review Your Project
After import, validation is essential. Hierarchies, milestones, and dependencies may need adjustment depending on how vendors formatted their Excel files. Publishing to Planner ensures that the schedule becomes collaborative, with real‑time updates and visibility for all stakeholders.
- Check hierarchy: Confirm outline levels and summary tasks are correct.
- Insert milestones: Add key deliverables if they didn’t import properly.
- Validate dependencies: Ensure predecessor relationships are intact.
- Publish to Planner: Share with your team for collaboration and reporting.
- Benefit: Creates a living schedule that integrates seamlessly into Planner.
What Changed Since 2024
| Feature | 2024 Method | 2026 Method |
|---|---|---|
| File Type | .xls export/import | Direct .xlsx import |
| Mapping | Manual import map creation | Auto‑mapping + templates |
| Hierarchy | Manual Outline Levels | Wizard supports hierarchy |
| Integration | Project Desktop only | Project Desktop + Planner |
| Templates | None | Excel Project Task List templates |
Planner Integration: The Big Shift
The most important change isn’t just technical, it’s strategic. Microsoft has retired Project for the web and merged its functionality into Planner, which now serves as the hub for collaborative project management.
This means:
- Imported schedules can be published directly to Planner.
- Teams can view tasks in Kanban boards, Gantt charts, or timeline views.
- Progress updates sync automatically across Project Desktop and Planner.
- Reporting is enhanced with Power BI dashboards connected to Planner data.
For organizations managing multiple vendors, this integration ensures that schedules don’t just sit in Microsoft Project; they become living documents that the entire team can engage with.
Best Practices for Smooth Imports
- Standardize Vendor Deliverables: Provide the Excel template upfront.
- Protect Confidential Data: Only import essential fields—leave out sensitive cost or resource details.
- Validate Dependencies: Double‑check predecessor relationships after import.
- Leverage Planner: Use Planner for collaboration, dashboards, and reporting.
Final Thoughts
In the past, importing Excel into Project was a workaround. Today, it’s a streamlined workflow that connects directly to Planner, enabling modern collaboration. By adopting the new Excel templates and using the improved Import Wizard, project managers can integrate vendor schedules quickly, maintain hierarchy, and ensure that every stakeholder, from internal teams to external partners, works from the same integrated view.
The bottom line: Excel remains the entry point, Project provides the structure, and Planner delivers the collaboration. Together, they form a powerful ecosystem for managing complex projects in today’s connected workplace.
Suggested articles:
- Top 10 Cons or Disadvantages of Using Microsoft Planner Software
- Microsoft Project Pricing Plans & Costs Guide
- The Pros and Cons of Using Microsoft 365 Software (formerly Office 365)
Andrew Makar, DMIT, PMP, CSM is an IT director with delivery experience across projects, programs and portfolios in Digital Marketing, Automotive, Software and Financial Management industries. He is an enthusiastic leader who effectively translates project management theory into practical application. His area of interest and practice is in implementing Agile processes and SCRUM techniques to deliver better software to his customers. Find out more about Andrew on andymakar.com and please reach out and connect with Andrew on LinkedIn.