Are you struggling with email overload and the elusive pursuit of “inbox zero”? You’re not alone. Many professionals find themselves buried under hundreds of unread emails, while others accumulate thousands of read messages that silently consume valuable mailbox storage. Email overload has become a widespread challenge affecting millions of professionals who rely on platforms like Microsoft Outlook and Gmail across organizations of every size.
Over time, the corporate communication standard has shifted dramatically, moving away from face-to-face interactions and toward an ever-growing reliance on email. The result? An overwhelming flood of meeting minutes, FYIs, carbon copies (CC), blind carbon copies (BCC), and cover-your-assets (CYA) emails, each one spawning yet another chain of replies, forwards, and acknowledgments cascading through entire departments and up the management hierarchy.
The volume of email in today’s workplace is simply unsustainable. Despite the proliferation of iPads, smartphones, tablets, laptops, and remote work tools that keep us constantly connected to corporate email, there must be a more effective strategy for managing email overload and achieving the coveted state of “inbox zero.”
My Inbox Zero Email Management Method
After several attempts at better email management, a simpler folder-based system emerged as the most effective approach. The system works by categorising emails according to purpose, keeping the primary inbox clean, and ensuring nothing critical slips through the cracks. It requires minimal daily effort once the initial setup is complete and the supporting routine becomes a habit.
Create the following folders in your email system to get started:
- CC: A dedicated folder for all emails where you are carbon copied, keeping lower-priority messages separate from those requiring your direct action.
- Follow Up: A holding space for any email you have flagged for a response or action, ensuring these items remain visible without cluttering the main inbox.
- Projects: A folder for critical project-related correspondence, which can be further divided into subfolders named after individual projects for easier retrieval.
- Archive: A long-term storage folder for older emails and attachments that do not require immediate action but may be needed for future reference.
Once the folders exist, the following routine helps keep your inbox consistently clear and everything organised:
- Automatically Move Any Emails Where You Are Carbon Copied to the CC Folder: This immediately signals that those messages are informational rather than action-required, freeing your attention for direct correspondence.
- Any Emails Marked for Follow-Up Appear in the Follow-Up Folder: Flagging emails before they leave your inbox ensures that pending tasks and outstanding replies are never lost among general messages.
- Any Critical Project-Related Emails Go Into a Project Folder: Moving these emails promptly keeps your project communication consolidated and easy to search when you need to revisit decisions or approvals.
- Move Attachments to the Archive Folder: Documents, reports, and files sent via email should be saved to the Archive folder or exported to your project storage system so they do not consume primary inbox space.
- Optionally Archive or Delete Everything Else in Your Inbox: Once sorted, any remaining emails that require no action and hold no long-term value can be archived or deleted to bring the inbox to zero.
- Clear the Follow-Up Folder Each Day: Reviewing and resolving flagged items daily prevents the folder from becoming a second backlog and ensures time-sensitive responses are not delayed.
- Delete the Archive, Notifications, and CC inbox Contents Each Month: A monthly purge of these folders keeps storage manageable and reinforces the discipline of not treating email as permanent filing.
Important emails or specific project-related issues can be stored in a Project subfolder, saved as a PDF, and filed with the project archives. Any email where you are CC’d is immediately lower priority than those addressed directly to you. You still need to read those emails, but they are secondary to managing the primary messages in your inbox.
Deleting emails from the inbox may feel risky, but you can always check your Sent folder for prior correspondence or contact the original sender directly. Having 600 unread emails is not a productivity achievement. It is simply 600 more messages that still need to be processed at some point.
Use Automated Rules
Most corporate email platforms, including Microsoft Outlook, Lotus Notes, and Gmail, support automatic rules that move messages into folders without manual effort. Running these rules every few days keeps the inbox manageable, eliminates repetitive sorting tasks, and ensures the folder system continues to function as intended without relying on manual intervention.
Three rules handle the majority of inbox noise effectively. Each targets a different category of low-priority or administrative email:
- Rule 1: Move all meeting decline, meeting accept, tentative meeting responses, and automatic responses to a Notifications folder, removing calendar noise from your primary view.
- Rule 2: Move all emails where your email address appears in the CC line to the CC folder, ensuring informational messages do not compete with direct action items.
- Rule 3: Move all emails received before a given date into the Archive folder, clearing older correspondence while preserving any messages still flagged for follow-up.
You can configure these rules in Outlook with just a few clicks, and with some adjustments, the same logic applies in Lotus Notes, Apple Mail, and Gmail.
How to Set Up Microsoft Outlook Email Rules
With just a few quick clicks, you will be on your way to inbox mastery using these Microsoft Outlook rules. The setup process takes under ten minutes and only needs to be completed once, after which the rules run automatically on every incoming message without any further input required.
Step 1: Create Your Folders
Click on the Inbox folder, then select the Folder tab in the Outlook Ribbon bar and click the New Folder icon. Enter the name of each folder and click OK, repeating the process for CC, Follow Up, Notifications, Projects, and Archive. For the Archive folder, consider creating a separate PST file stored on your local drive to prevent archived mail from consuming server storage space.

Step 2: Set Up the CC Rule
The CC rule automatically routes lower-priority messages out of your main inbox the moment they arrive. Follow these steps to configure it:
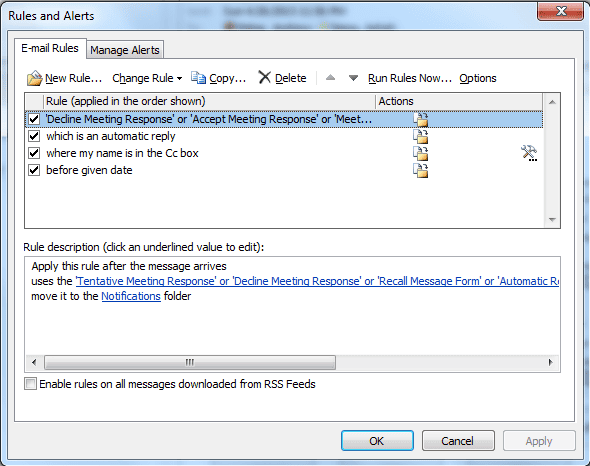
- In the Outlook Ribbon bar, click on the Home tab, then the Rules icon, and select Manage Rules and Alerts.
- Click on the New Rule button to open the Rules Wizard.
- Click on “Apply Rule on Messages I Receive” to set the trigger for incoming email.
- Click Next to proceed to the conditions screen.
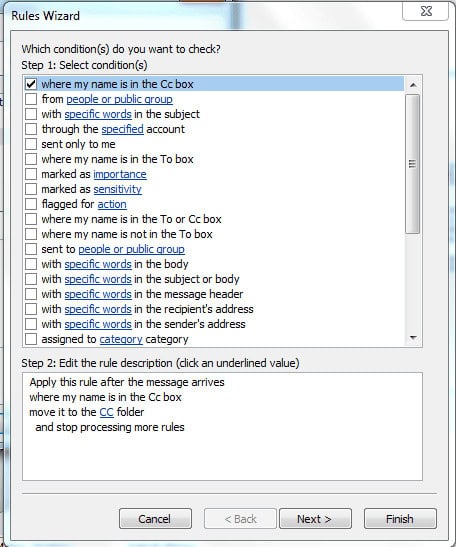
- Click on “where my name is in the Cc box” to target only emails where you are carbon copied.
- Click Next to move to the actions screen.
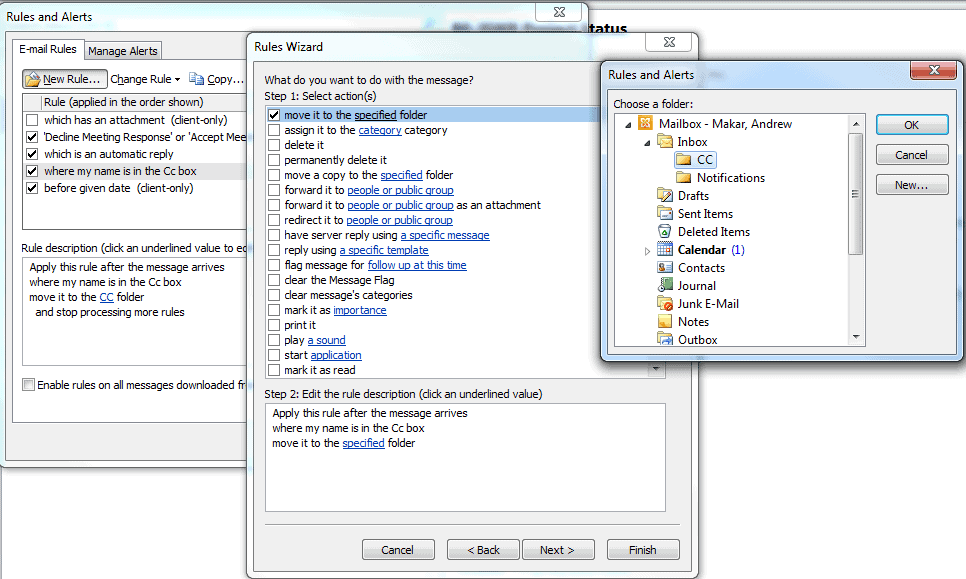
- Click on “Move it to the specified folder” to define where matched emails will be sent.
- Enter the name of your folder (CC) and confirm the selection.
- Click OK to apply the folder selection.
- Click Next to review any exceptions you wish to add.
- Click Next again to proceed to the final confirmation screen.
- Enter the name of the rule so it is easy to identify in your rules list.
- Click Finish to save and activate the rule.
Step 3: Set Up the Notifications Rule
The Notifications rule is similar to the CC rule and is easily created by following the same prompts. It targets calendar responses and automatic replies, routing them away from the inbox so meeting-related noise does not obscure messages that require a direct response or decision from you.
Navigate to Manage Rules and Alerts, click New Rule, and select “Apply Rule on Messages I Receive.” When you reach the conditions screen, follow these steps:
- In the Outlook Ribbon bar, click on the Home tab, then the Rules icon, and select Manage Rules and Alerts.
- Click on the New Rule button.
- Click on “Apply Rule on Messages I receive.”
- Click Next.
- Click on the “uses form name form” condition to target specific message types.
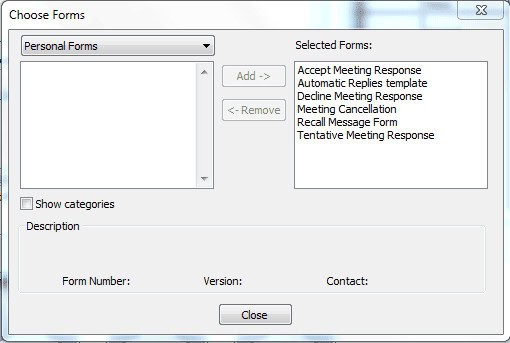
- Click on the form name link to open the form selector.
- Select Application Forms from the dropdown to access Outlook’s built-in templates.
- Add the Accept Meeting Response, Automatic Replies, Decline Meeting Response, Meeting Cancellation, Recall Message From, and Tentative Meeting Response forms to capture all calendar-related notifications.
- Click Close to confirm your selections.
- Click Next to proceed to the actions screen.
- Click on “move it to the specified folder” and select the Notifications folder.
- Click Next, then Next again.
- Enter the name of the rule and click Finish to save it.
Step 4: Set Up the Archive Rule
The Archive rule is similar to the CC rule and is easily created by following the same prompts. Rather than targeting sender or message type, it filters by date, moving older emails out of the inbox in bulk and keeping only recent correspondence in your primary view without removing flagged items.
- In the Outlook Ribbon bar, click on the Home tab, then the Rules icon, and select Manage Rules and Alerts.
- Click on the New Rule button.
- Click on “Apply Rule on Messages I receive.”
- Click Next.
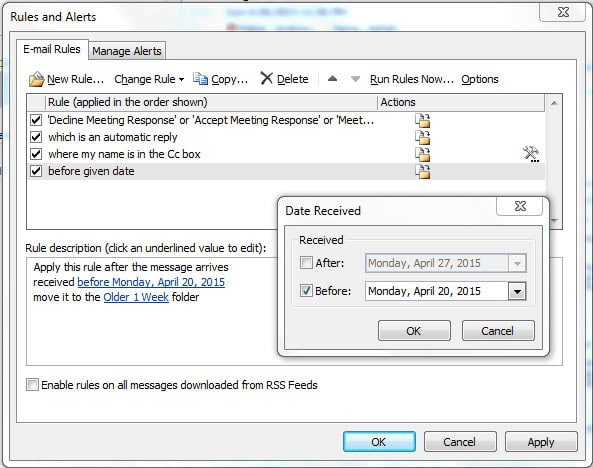
- Click on “received in a specific date span” to filter by message age.
- Click on the “in a specific date span” link to open the date selector.
- Click on the Before checkbox to capture all emails older than your chosen date.
- Enter a date that reflects how far back you want to archive, such as 30 or 60 days ago.
- Click OK to confirm the date condition.
- Click Next to move to the actions screen.
- Click on “move it to the specified folder” and select the Archive folder.
- Click Next, then Next again.
- Enter the name of the rule and click Finish to save it.
Step 5: Run Your Rules
Your rules will run automatically as new emails arrive, with the exception of the Archive rule, which requires a manual trigger. From the Rules and Alerts dialogue box, follow these steps to run all rules at once:
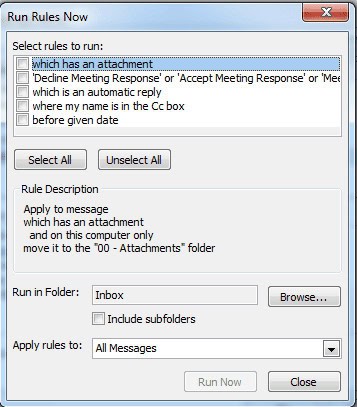
- Click Run Rules Now to open the manual run interface.
- Select all the rules you have defined to ensure every rule is applied in this session.
- Set the target to Run in the Folder: Inbox so the rules process your primary email location.
- Check the Include Subfolders option to catch any messages stored in nested inbox folders.
- Click Run Now to execute all selected rules immediately.
Within a few seconds, your emails will be sorted and archived, and you can begin enjoying the clarity of an empty inbox.
Caveats
This email management process works well and creates a clutter-free inbox that leaves only today’s emails and a handful of follow-ups in view. However, you must check the CC and Notifications folders regularly to avoid missing critical responses. Decline notices with proposed new meeting times are easy to overlook when routed away from the main inbox.
Better email management means keeping your inbox clean and organised, but it should never come at the cost of missing a critical request. Run your rules consistently, check your supporting folders daily, and enjoy the clarity that comes with achieving inbox zero.
Conclusion
Inbox zero is not about perfection. It is about building a system that reduces noise, surfaces what matters, and makes it possible to stay on top of communication without feeling constantly behind. The folder structure and automated rules described here create exactly that kind of sustainable, repeatable process for any professional managing high email volume.
Start by creating the four core folders and configuring the three rules in Outlook. Run them for the first time and experience the immediate clarity of a sorted inbox. With a consistent daily and monthly maintenance routine, inbox zero stops being an aspiration and becomes a reliable baseline for how you manage your workday.
FAQs
What does inbox zero actually mean?
Inbox zero refers to keeping your email inbox empty or nearly empty at all times. The goal is not to have zero emails at every moment, but to have a reliable system for processing, organising, and clearing messages so the inbox never becomes a persistent source of backlog or stress.
How often should I run my email rules?
Running your rules every two to three days is a practical starting point for most professionals. The CC and Archive rules in particular generate the highest volume, so running them more frequently during busy periods helps prevent the inbox from accumulating clutter between sessions.
Will I miss important emails if I automate sorting?
Not if you check your supporting folders consistently. The CC and Notifications folders should be reviewed daily or every other day. Emails flagged for follow-up remain visible in the Follow Up folder, which should be cleared each day to ensure nothing actionable is overlooked.
Can this system work in Gmail as well as Outlook?
Yes. Gmail supports filters and labels that function similarly to Outlook rules. You can set up filters to route CC emails to a specific label, archive older messages automatically, and separate notification emails from primary inbox items. The folder names differ, but the underlying logic is the same.
How do I handle emails that do not fit into any of the four folders?
If an email does not belong in CC, Follow Up, Projects, or Archive, it should remain in the inbox only if it requires a direct response. Once you have replied or taken action, move it to the Archive folder or delete it. Letting unresolved emails accumulate in the inbox defeats the purpose of the system.
Suggested articles:
- How Email Software Facilitates Better Project Management
- How to Recover Deleted Emails from Exchange Server?
- How to Implement Email Verification in Your Online Business
Andrew Makar, DMIT, PMP, CSM is an IT director with delivery experience across projects, programs and portfolios in Digital Marketing, Automotive, Software and Financial Management industries. He is an enthusiastic leader who effectively translates project management theory into practical application. His area of interest and practice is in implementing Agile processes and SCRUM techniques to deliver better software to his customers. Find out more about Andrew on andymakar.com and please reach out and connect with Andrew on LinkedIn.